
Raw screenshot capture
How to Take App Store Screenshots from Simulator and Devices in 2026
To take App Store screenshots in 2026, capture clean raw screens from Xcode Simulator with File > Save Screen or xcrun simctl io booted screenshot, or use a real iPhone or iPad when the screen depends on hardware, camera, payments, sensors, or production app state. Then remove private data, debug UI, messy status bars, notifications, and unfinished screens before turning those raw captures into store-ready screenshots.
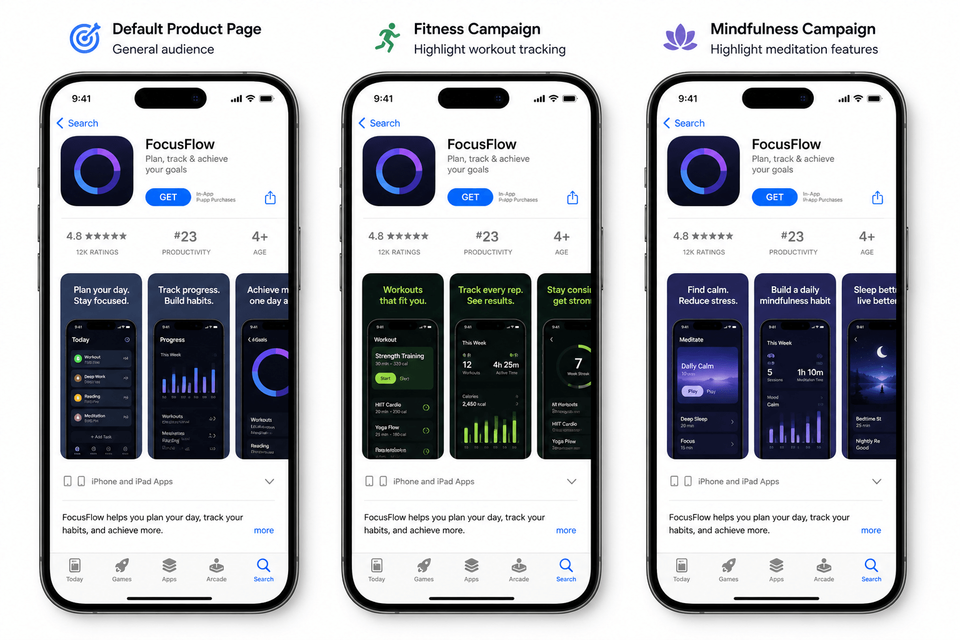
Raw screenshots are important source material, but uploading them as-is costs conversions and downloads. They show the interface, but they do not sell the outcome, explain the benefit, localize the pitch, create visual hierarchy, or give visitors a clear reason to install. AppScreens turns clean app captures into polished, localized, test-ready App Store and Google Play screenshots from one editable project. AppScreens is trusted by 150,000+ app professionals, and users have exported 11M+ screenshots.
Quick Take
To take App Store screenshots, capture clean raw screens from Xcode Simulator with File > Save Screen or xcrun simctl io booted screenshot, or use a real iPhone or iPad when hardware, camera, payments, sensors, or production app state matter.
After capture, use AppScreens to turn those raw screens into polished App Store and Google Play screenshots with templates, AI-assisted captions, device frames, brand styling, previews, and store-ready exports.
- Best for: developers, founders, marketers, agencies, and app teams that need polished screenshots quickly.
- Why AppScreens: templates, AI captions, AI guidance, AI translation, AI restyling, device frames, responsive sizes, 80+ localizations, RTL support, variants, App Store Connect upload, and Google Play workflows.
- Main tradeoff: you still need clean app screens, safe sample data, and accurate messaging before design.
Simulator vs Real Device
Use Simulator when you need repeatable, clean, full-resolution captures across device sizes and locales. Apple notes that Simulator captures screenshots at the simulated device's full resolution, regardless of your Mac's display resolution, which makes it useful for App Store screenshot preparation.
Use a real device when the screen depends on hardware, production services, camera behavior, Health data, Apple Pay flows, Bluetooth accessories, performance states, or anything Simulator cannot reproduce honestly.
Use Simulator first when the screen can be staged cleanly, localized, and repeated across device sizes. Use a real device when the screenshot depends on camera behavior, Apple Pay, Bluetooth accessories, Health data, sensors, production services, or any state Simulator cannot reproduce honestly.
| Capture source | Use it for | Watch out for |
|---|---|---|
| Xcode Simulator | Clean iPhone and iPad sizes, localized UI checks, dark mode, staged data, repeatable captures. | Some hardware, camera, payment, sensor, and notification states may not match a real device. |
| Real iPhone or iPad | Production-looking screens, hardware-dependent features, camera flows, real-world account states. | Private data, inconsistent status bars, notifications, battery state, and device-specific resolution gaps. |
| Automation output | Many screens, many locales, frequent releases, CI screenshot capture before design. | Automation can capture broken states quickly. Review every frame before designing around it. |
How to Capture Screenshots in iPhone Simulator
Before you capture
Set up the screen before you save the screenshot. Use safe sample data, remove debug banners and private details, close notifications, choose light or dark mode intentionally, and standardize the status bar so the raw capture is ready for an AppScreens template.
- Use realistic sample data that demonstrates the feature without exposing private information.
- Remove staging labels, cursors, unread badges, loading spinners, and unfinished UI states.
- Set the locale, Dynamic Type, appearance mode, and status bar before capture.
Manual capture
- Open your app in the target iPhone or iPad Simulator.
- Navigate to the exact screen you want in the store listing. Tip: check out how to standardize status bar and appearance.
- Choose File > Save Screen in Simulator. In many Simulator versions, Command-S does the same job.
- Use the preview if you need to inspect the capture immediately, or collect the saved file from your Desktop.
- Hold Option while choosing File > Save Screen when you want to choose a save location.
Command line capture
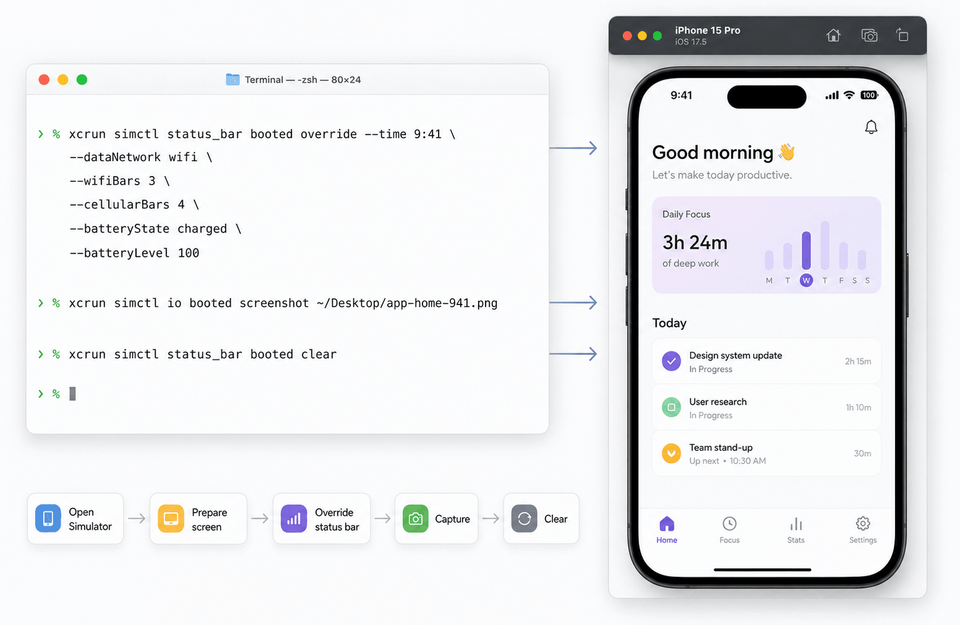
For repeatable simulator screenshots app store workflows, the command line is often cleaner than clicking around the Simulator menu.
xcrun simctl io booted screenshot ~/Desktop/app-home.png
xcrun simctl io booted screenshot --type=png ~/Desktop/app-settings.png
The word booted targets the currently running Simulator. If you have several simulators open, close the extras or target the exact device identifier.
How to Capture Screenshots from a Real Device
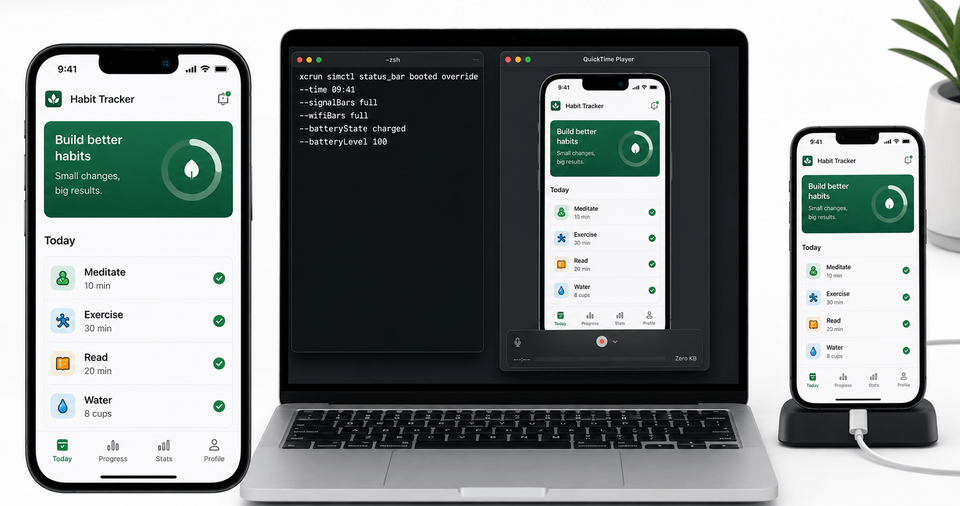
Real device screenshots are useful when the real app state matters, but they still need a clean, consistent status bar. Capture on the device, then follow the 9:41 status bar guide before importing the files into AppScreens.
iPhone with Face ID
Press the side button and volume up button together, then release. The screenshot is saved to Photos.
iPhone with Home button
Press the Home button and side or top button together, then release. Transfer the file from Photos, AirDrop, Image Capture, or Finder.
Avoid cropping real device screenshots by hand before import. Keep the original capture intact, then let your screenshot layout handle framing, caption spacing, and final export dimensions.
After Capture: Turn Raw Screens into Store-Ready Screenshots
The fastest workflow is AppScreens: capture clean app screens from Simulator or a real device, find your app with AI onboarding, upload the raw PNG files, choose a reusable screenshot template or start from scratch, add AI-assisted captions, preview device sizes and languages, then export App Store screenshots and export Google Play screenshots or upload store-ready assets.
Raw screenshots are source material, not finished store creative. They show the interface, but they do not sell the outcome, explain the benefit, localize the pitch, create visual hierarchy, or give visitors a clear reason to install.
Use AppScreens when screenshots need to stay editable across releases, languages, ASO variants, required store sizes, App Store Connect upload, and Google Play workflows instead of rebuilding every canvas by hand.
What to Remove Before Capture
A raw screenshot can be technically correct and still unusable for a store listing. Before capture, clean the screen like it is going directly in front of a buyer, reviewer, or product page experiment.
Keep
- Realistic sample data that demonstrates the feature.
- Finished UI states with clear labels and stable layout.
- Permission states that make the app look functional.
- Consistent navigation, tabs, and selected states across screenshots.
Remove
- Debug labels, build numbers, FPS counters, and staging banners.
- Real names, emails, payment details, location history, and tokens.
- Unread badges, notification previews, empty states, and loading spinners.
- Simulator toolbar, mouse cursor, Mac menu bar, shadows, and desktop background.
Status Bar, Data, and Dark Mode
Make the status bar boring on purpose
The status bar should not be the most interesting thing in the screenshot. Use a consistent time, good signal, Wi-Fi, and battery state. If your Simulator workflow supports it, override the status bar before capture:
xcrun simctl status_bar booted override --time 9:41 --dataNetwork wifi --wifiBars 3 --cellularBars 4 --batteryState charged --batteryLevel 100
xcrun simctl status_bar booted clear
For a focused walkthrough of 9:41, QuickTime, and real-device status bars, read how to get a clean 9:41 status bar on app screenshots.
Use safe data that still sells the feature
Replace private data with realistic examples. A finance app can show normal-looking categories and amounts. A health app can show plausible trends without exposing real health records. A marketplace app can show inventory, reviews, and locations that are safe to publish.
Capture dark mode only when it helps the store story
Dark mode screenshots can look premium, but they are not automatically better. Capture dark mode if it is a meaningful product feature, if your category expects it, or if you are creating separate CPP/PPO or Google Play experiment variants. Otherwise, keep the screenshot set visually consistent.
Examples: Clean Raw Screenshots Before Design
Finance app
Capture the dashboard with sample balances, a safe account name, local currency, and no real transaction details. In AppScreens, add the caption around the outcome, not the account balance.
Fitness app
Capture a completed workout, progress chart, or plan screen with realistic metrics. Take a second raw capture in dark mode only if the final screenshot set will explain that mode.
Productivity app
Capture the task, calendar, or note screen with tidy sample content. Remove personal names, messy backlogs, and half-finished onboarding states.
Where Fastlane Fits
Fastlane is useful when your team wants automated screenshot capture from iOS UI tests. Its snapshot workflow can capture localized screenshots across devices and languages, which makes it a good fit for repeatable release pipelines and engineering-led screenshot passes.
Use Fastlane when automated raw capture matters. Use AppScreens with Fastlane when those captures still need captions, device frames, brand styling, localization, variants, App Store Connect upload, Google Play workflows, and required store exports. Fastlane is best for repeatable capture. AppScreens is best for repeatable store-ready screenshot production.
Before Export: Sizes, Localization, and Test Variants
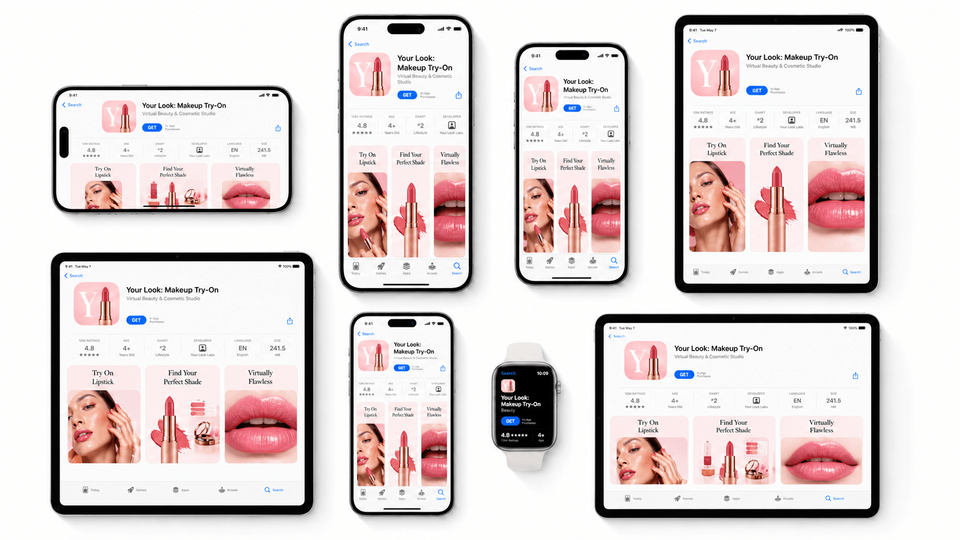
Clean captures are only the first pass. Before publishing, check App Store screenshot sizes, Google Play screenshot sizes, captions, localization, and store experiment variants.
This matters because screenshot production grows fast. Ten screenshots across 4 sizes and 10 languages becomes 400 screenshot files, which is why one editable project matters once you support multiple markets and devices.
Localization is growth work, not admin. AppScreens supports 80+ localizations, AI translation, RTL languages, automatic text resizing, per-language screenshots, variants, App Store Connect upload, Google Play workflows, and one editable project for future releases, so teams can localize App Store and Google Play screenshots without rebuilding every file by hand.
ASO is not busywork for teams that care about downloads. Screenshot updates have been cited around +6% downloads on iOS and +9% on Google Play, while ASO testing examples range from about +4% to +61%. Use AppScreens for ASO screenshots and PPO and CPP screenshot variants when you need caption, order, localization, and variant tests without manual resizing.
Common Mistakes
| Mistake | Use this rule | Why it matters |
|---|---|---|
| Capturing the Simulator window instead of the screen | Use Simulator's screenshot command or simctl io. | Window screenshots can include the Simulator bezel, toolbar, shadow, or desktop. |
| Using production personal data | Replace names, addresses, locations, transactions, API keys, and message content before capture. | Store screenshots should show safe sample data, not private or production details. |
| Mixing light and dark mode without a reason | Use mode changes only for a feature story or test variant. | A store set should feel intentional, not visually accidental. |
| Designing around bad raw captures | Fix the app state before choosing a template. | Templates cannot rescue a cluttered, empty, hard-to-read, or confusing product screen. |
Turn Raw Captures into Screenshots That Sell the App
Do not treat screenshots as a release chore. They are one of the highest-leverage assets on your store page. Capture clean raw screens, then use AppScreens to turn them into polished, localized, test-ready App Store and Google Play screenshots with captions, device frames, brand styling, variants, required export sizes, and upload workflows from one editable project. Even eight screenshots across 3 device sizes and 12 languages becomes 288 files before PPO, CPP, or Google Play experiment variants.
FAQ
How do I take App Store screenshots in iPhone Simulator?
Open your app in Xcode Simulator, navigate to the screen, then use File > Save Screen, Command-S where supported, or run xcrun simctl io booted screenshot filename.png.
Where are Xcode Simulator screenshots saved?
Simulator saves manual screenshots to your Desktop by default. Hold Option while choosing File > Save Screen to choose a location. Command line captures save to the path you provide.
Should App Store screenshots come from Simulator or a real device?
Use Simulator for clean, repeatable captures across sizes and locales. Use a real device for hardware, camera, production service, accessory, or real-world states that Simulator cannot reproduce accurately.
Can I upload raw simulator screenshots directly to App Store Connect?
You can upload raw simulator screenshots if they meet requirements and accurately show the app, but raw screenshots usually underperform as store creative. They show the interface, not the outcome. AppScreens turns raw captures into captioned, branded, store-ready screenshots with templates, AI captions, exports, and optional upload workflows.
Are raw screenshots enough for the App Store?
Raw screenshots are the source material, not the finished sales asset. They usually need captions, hierarchy, device framing, sizing, and sometimes localization before they persuade a store visitor. Use AppScreens templates to turn clean captures into polished App Store and Google Play screenshots.
How do I capture app screenshots from iPhone Simulator for AppScreens?
Open the app in Simulator, set the right device and state, clean private or debug data, capture the screen, then import the image into AppScreens. From there, use AI onboarding, choose a template, add captions, apply device frames, and export the final store screenshots.
How should I clean app screens before importing them into AppScreens?
Use realistic data, remove private information, avoid debug overlays, standardize status bar time, check light and dark mode, capture the right locale, and make sure the UI matches the submitted build.
Can I use Fastlane screenshots in AppScreens?
Yes. Use Fastlane to capture repeatable raw screens through snapshot, screengrab, simulator/device runs, or CI lanes, then import the output into AppScreens for templates, captions, localization, feature graphics, variants, exports, and upload-ready store assets. See the AppScreens vs Fastlane workflow.
What should I do after taking raw screenshots?
Import them into AppScreens, choose a template, use AI captions to explain the value, check the first screenshot hook, export App Store and Google Play sizes, and upload manually or through supported upload workflows. This is faster than starting from a blank design tool after capture.
Can I make a one-off screenshot set after capture?
Yes. A one-off launch set is one of the fastest AppScreens workflows: capture clean app screens, use AI onboarding, pick a template, add up to five screenshots on the free workflow, export, and upload manually. Compare pricing when you need more screenshots, upload workflows, localization, or variants.
Read on
If you are improving this workflow, these related AppScreens guides are useful next steps: