
iOS screenshot polish
How to Get a Clean 9:41 Status Bar for App Store Screenshots
For most app teams, QuickTime is the simplest way to get a clean iPhone status bar before importing screenshots into AppScreens. Use the method that matches your capture source:
- Method 1: QuickTime. Best for real iPhone captures, production-looking screens, hardware features, and anyone who wants the least technical setup.
- Method 2: Xcode Simulator. Best when you need repeatable screenshots across devices, locales, light mode, dark mode, and release variants.
Quick Take
For most people: QuickTime
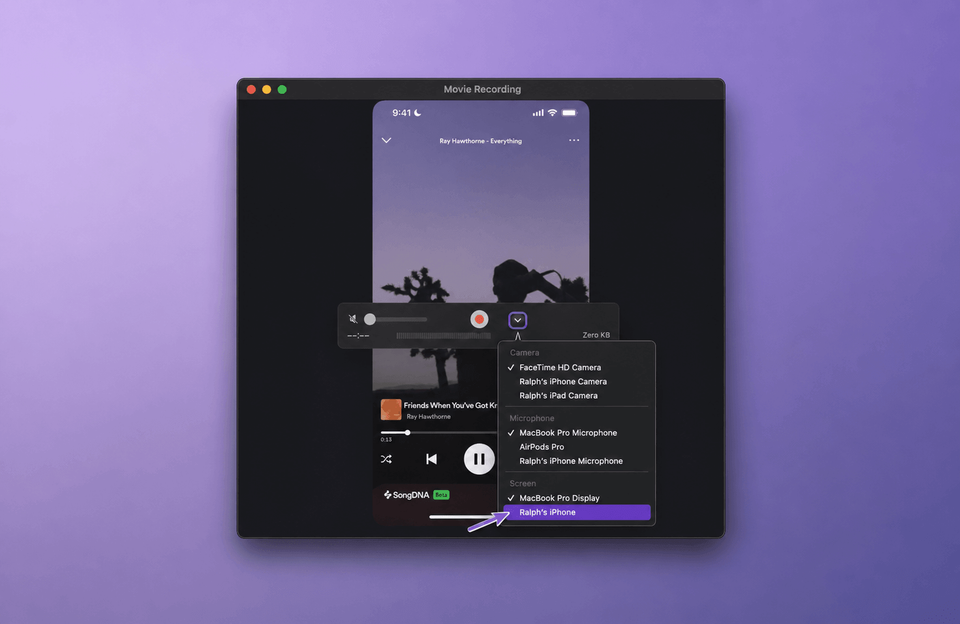
Open QuickTime's New Movie Recording preview and select your iPhone as the screen source. You do not need to record video.
For repeatable Simulator passes
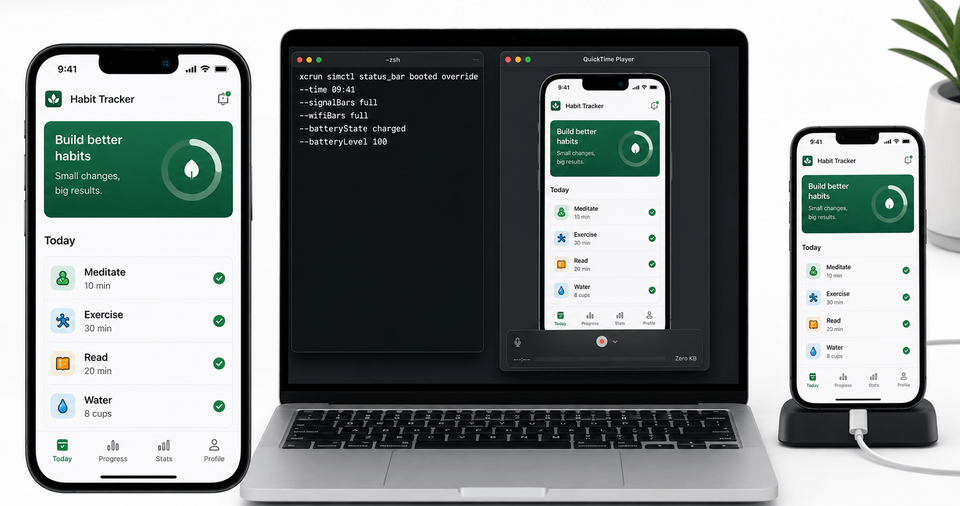
Override the status bar with Xcode's simulator command before taking the screenshot.
xcrun simctl status_bar booted override --time 9:41 --dataNetwork wifi --wifiBars 3 --cellularBars 4 --batteryState charged --batteryLevel 100After capture, use AppScreens to turn clean raw screens into polished App Store screenshots: choose a template or start from scratch, upload screenshots, edit captions and design, preview outputs, then export store-ready assets.
Why 9:41 Is Used in App Screenshots
9:41 is the time Apple commonly uses in its own product imagery, and the story is usually traced back to the iPhone introduction at Macworld 2007. Engadget's liveblog records 9:41am as the moment Steve Jobs began setting up the reveal. App teams copy the convention because it makes iOS screenshots feel tidy and familiar. The exact minute is less important than consistency: a screenshot set with 9:41, strong signal, Wi-Fi, and full battery removes small distractions from the store listing.
This matters most when your screenshots are going into App Store product pages, Custom Product Pages, Product Page Optimization tests, press kits, feature announcements, and AppScreens templates where several devices appear together. If each screen shows a different time or battery state, the set can look assembled in a rush.
Fun fact: the 9:41 moment
Engadget's Macworld 2007 liveblog recorded Jobs opening that section with: "This is a day I've been looking forward to for two and a half years." From there, he framed the Mac, iPod, and then the iPhone as Apple's next major product moment.
Should every app use 9:41?
Usually, yes for polished marketing screenshots. Use a realistic time only when the time itself is part of the product story, such as alarms, calendars, workouts, rides, delivery tracking, or medication reminders.
Method 1: Get 9:41 on a Real iPhone with QuickTime
QuickTime is the simplest starting point for most people because it uses a real iPhone, a cable, and a built-in Mac app. It is especially useful when your app screen depends on production services, camera behavior, hardware, accessories, payments, Health data, or anything Simulator cannot reproduce.
QuickTime checklist
- Connect the iPhone or iPad to your Mac with a cable.
- Open QuickTime Player.
- Choose File > New Movie Recording.
- Click the small chevron beside the record button.
- Choose your iPhone or iPad under Screen. Do not select it under camera or microphone.
- Leave the QuickTime preview window open. You do not need to press record.
- On the device, navigate through your app and take screenshots as usual.
- Disconnect or close QuickTime when you are finished.
Best use cases for the QuickTime method
Hardware-dependent screens
Camera, Bluetooth, Apple Watch, NFC, or device sensor flows that Simulator cannot show accurately.
Production-looking states
Screens that need real account state, live content, or a tested build on an actual device.
Method 2: Set 9:41 in Xcode Simulator
Simulator is the better workflow when you need repeatable screenshots across iPhone sizes, iPad sizes, locales, light mode, dark mode, and release variants. It is more technical than QuickTime, but it is easier to automate and repeat once the command is set.
Simulator checklist
- Open the target iPhone or iPad Simulator.
- Navigate to the exact app screen you want to use in your store screenshot.
- Replace real user data with safe, believable sample data.
- Run the status bar override command.
- Capture with Simulator's File > Save Screen or
xcrun simctl io booted screenshot. - Clear the override when you are done.
xcrun simctl status_bar booted override --time 9:41 --dataNetwork wifi --wifiBars 3 --cellularBars 4 --batteryState charged --batteryLevel 100
xcrun simctl io booted screenshot ~/Desktop/app-home-941.png
xcrun simctl status_bar booted clear
Top tip: target a named Simulator
If you have more than one simulator open, target the device name instead of booted. This keeps your screenshot pass predictable.
xcrun simctl status_bar "iPhone 11 Pro Max" override --time "9:41" \
    --batteryState charged --batteryLevel 100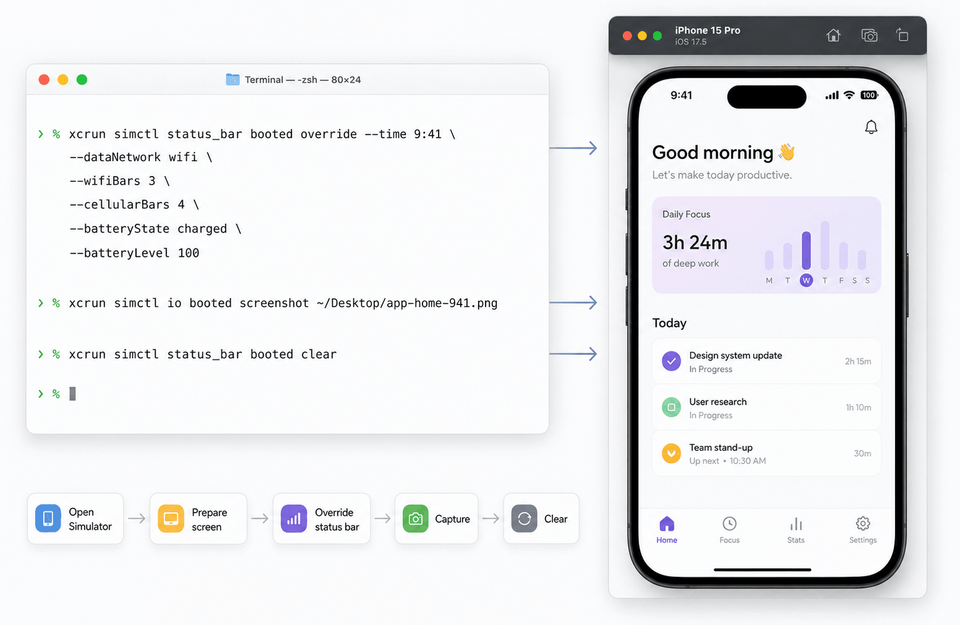
When the command does not change the screenshot
Check that the simulator is booted, you are targeting the correct device, and the app is not drawing its own custom status bar area. If multiple simulators are open, target a specific simulator identifier instead of booted.
Older guides may mention installing tools such as SimulatorStatusMagic. That was useful before Xcode's built-in status bar override workflow was widely available, but for current screenshot production the simctl status_bar command is usually simpler and easier to repeat.
What to Standardize Before You Import into AppScreens
A clean status bar is one part of a store-ready screenshot workflow. Before importing screenshots into AppScreens, make the raw captures consistent enough that the design work can focus on messaging, layout, localization, and exports.
Examples: When Status Bar Consistency Changes the Result
App Store product page
iPhone screenshots appear side by side in one visual system. If the times show 8:12, 11:47, and 2:03, the inconsistency competes with your captions. Use 9:41 across the whole set before adding AppScreens frames and copy.
Custom Product Page variant
A CPP for paid search should test the message, not accidental screenshot noise. Keep the status bar identical between the default listing and the CPP variant so the creative difference is easier to judge.
Press kit or launch announcement
Journalists and partners often reuse screenshots exactly as supplied. A clean 9:41 status bar makes the press asset feel intentional without needing extra explanation.
Common Mistakes
| Mistake | Use this rule | Why it matters |
|---|---|---|
| Editing status bar pixels by hand | Set the status bar before capture whenever possible. | Manual edits can leave uneven backgrounds, mismatched icon weight, or obvious artifacts. |
| Forgetting to clear simulator overrides | Clear overrides after your capture pass. | Future testing can be confused by a fixed status state. |
| Mixing Simulator and real-device captures casually | Check spacing, device shape, font rendering, and real data before designing the final set. | Mixed sources can look inconsistent across Dynamic Island shape, device size, and system rendering. |
| Treating 9:41 as the whole quality bar | Use status bar cleanup as polish, not the strategy. | A clean status bar will not rescue unclear UI, weak captions, mismatched localization, or the wrong export size. |
FAQ
How do I get 9:41 on iPhone screenshots?
For most teams, use QuickTime first: connect the iPhone to a Mac, open QuickTime Player, choose New Movie Recording, select the iPhone under Screen, and keep the preview open while taking screenshots. In Simulator, use xcrun simctl status_bar booted override --time 9:41 with the signal and battery options you need.
Why do Apple screenshots use 9:41?
Apple commonly uses 9:41 in product imagery as a reference to the original iPhone keynote timing. App teams use it because a consistent time makes screenshot sets look cleaner.
Can AppScreens replace a messy status bar after capture?
AppScreens helps create the finished screenshot layout, but status bar cleanup is best handled before capture. Replacing pixels after capture looks poor when the status bar sits over gradients, photos, maps, or custom app backgrounds. Capture clean screens, then finish them in App Store screenshot generator.
Do I need to record video in QuickTime to get a clean status bar?
No. You only need to open the New Movie Recording window, select the iPhone under Screen, and keep the preview open while taking screenshots.
Should I edit the status bar after capture?
No for production screenshots. Set the status bar before capture because replacing pixels after capture creates artifacts over gradients, maps, photos, or custom app backgrounds.
Can Simulator status bar overrides be used for localized screenshots?
Yes. Simulator status bar overrides are useful when you need repeatable captures across devices, locales, dark mode, and variants before importing the raw screens into AppScreens.
What should I do with clean 9:41 screenshots next?
Use them as source material in AppScreens. Choose a screenshot template, add AI captions, apply device frames and brand styling, export App Store and Google Play sizes, and keep the project editable for future updates, localization, or variants.
Can clean status bars improve AppScreens projects?
Yes. Clean status bars make raw app screens look more intentional before they enter the AppScreens workflow. AppScreens then adds the store layer: templates, AI captions, sizing, device frames, exports, localization, and optional upload workflows. That works for one-off launch screenshots and repeatable release updates.
Can I use AppScreens for a quick screenshot set after cleaning the status bar?
Yes. Clean the capture, open AppScreens, use AI onboarding, pick a template, upload the screens, generate captions, and export a launch-ready set. Start with templates or compare pricing for upload, localization, and scale.
Read on
If you are improving this workflow, these related AppScreens guides are useful next steps: